Dan Drust
Software Engineer based in West Michigan
https://dan.drust.dev
dandrust@gmail.com
Creating a Custom Color Selector
16 April 2020
This article was orignally posted on the Spark Business Works Insights Blog
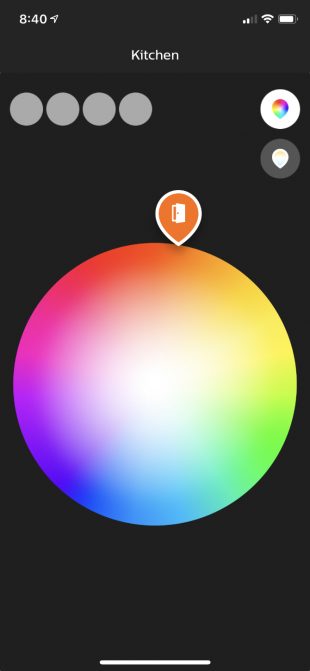
We recently needed to implement a circular color picker similar to the one used by the Hue light bulb mobile app. We needed this to be circular, have white in the middle, and we needed to be able to move a marker and capture the color at that point when a user taps or clicks the wheel. We couldn’t find a suitable open source solution, so we decided to write this ourselves.

The color wheel
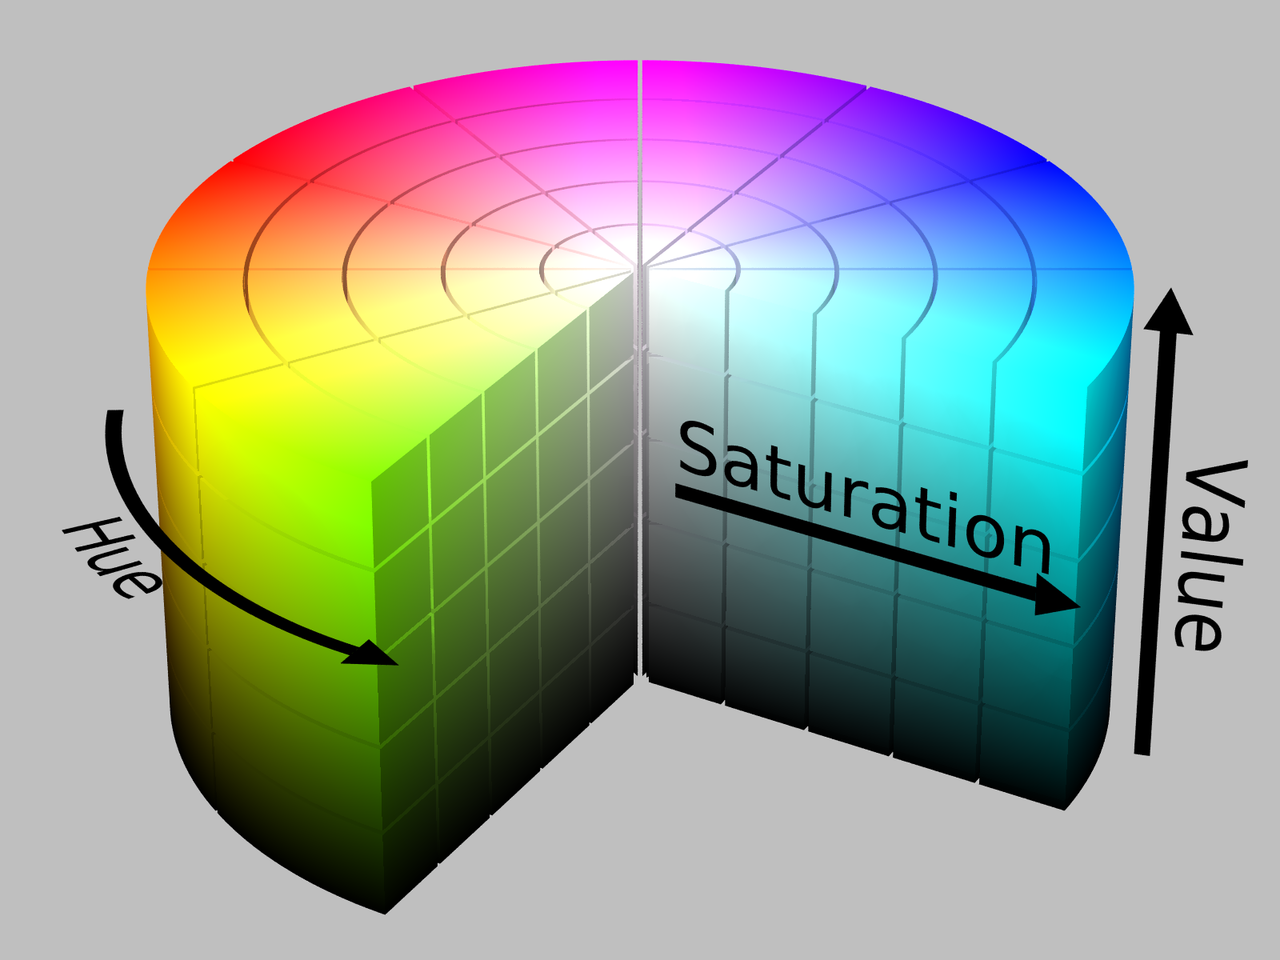
In the end, our color picker widget needs to be able to capture an RGB color value and send it off the the back end. Though, we noticed that a number of color pickers we analyzed reported HSL values. We found this helpful article that explains some mathematical foundations behind computing colors. (We didn’t read it, we just looked at the pictures!) The picture of a color cylinder looked exactly like what we’re trying to create. We noticed that the hue value changes as you rotate around the circle, lightness varies from near-white in the center to a fuller color on the edges. The scale marked “Value” in the image probably wasn’t as important to us – we don’t want to display black on our color wheel. We decided to use this scheme to calculate a Hue, Saturation, Lightness value which we could then convert to an RGB value.

One color picker example we saw used a series of very thin pie slices to construct a color wheel. So we took that approach. The hue value of the HSL triad is a value from 0-360 (as in, 360 degrees in a circle).
So to begin, let’s create a series of rectangles with increasing hues:
Then we made these blocks really skinny and arranged them around a point:
Now we needed to get the gradient to show up. We need a white center with a colorful ring outside. The HSL resource from earlier told us that 100% lightness would be white, while 0% lightness would be black. We applied a linear gradient from 50% to 100% lightness to each pie slice:
Looks great! This widget is going to show up on a touchscreen, so we were worried about how small the white area was in the center. It might be hard for fat fingers to select white. Our template also has a considerably bigger white center. Instead of getting fancy with the gradient background, we decided to open up a hole in our circle and throw a white background behind the center of our new doughnut.
Putting a selector on it
We had our color wheel, but no way for the user to interact with it. We don’t have a great native HTML input element that we could use here, so we decided to draw a little selector circle on top of the color wheel to indicate the user’s selection, just like the Hue app does. This seemed like a good job for a canvas element - that would allow us to overlay an image over the color wheel that we can draw (and redraw!) programmatically. We decided to lay a 2D canvas over our color wheel where we could draw our selector button and move it around based on coordinates when a user touches the display.
Next we needed to be able to click/tap to move the circle. We put a click handler on the canvas to get the coordinates of the click, redraw the circle at that point, and then redraw the canvas:
We noticed that you’re able to click outside of the color picker’s bounds. Go ahead and try it above. That’s because the canvas is a square and we’re allowing the selector to move anywhere in that square. We need the selector to stay within the circle. How can we tell, given an (x, y) coordinate, if we’re inside the circle or not?
The Ghost of High School Math
So our problem at hand is that we need to know when a click is outside of our color wheel. We know that there’s a certain point (x, y) that represent the center of our circle, and we know that the radius of the circle is 210 units. So we can use the Pythagorean Theorem to tell us if the distance from the center of the wheel to a clicked point is greater than the radius of the circle - meaning that the user has selected a point outside of our color wheel.
Now that we know when a user is out-of-bounds, how do we keep them in-bounds? It would be great if we could move the selector to the edge of the circle but no further when a user clicks out of bounds.
This part proved pretty challenging. We didn’t have a great way to find a point along a line that was only so far away from the center.
Getting polar
Based on some fact-finding we’d done about HSL values, we knew that in the end we’d need to know a couple things:
- The hue, represented by an angle 0-360 degrees
- The saturation will be fixed
- The lightness, represented by the distance the selection is from the center of our color wheel
Knowing the angle would also help us with our issue of keeping the selector in bounds. If we can work out the angle from the center to a point out-of-bounds, we could use that same angle and our circle radius to figure out where the “edge” of our circle is on the square canvas.
So far we’ve been using coordinate pairs (x, y) that count from the top-left corner. We’ll write a little conversion function to convert these coordinates to (angle, length) pairs that originate in the center of our color picker. So now we’re dealing with polar coordinates! This primer on the polar coordinate system was very useful!
Don’t cross the line
Now we’re ready to fix our issue of the selector being able to leave the circle. We:
- Convert
(x, y)to(angle, length) - Compare length to the circle’s radius to determine if it’s in bounds
- If in-bounds, set target point to
(angle, length)- don’t change a thing! - If out-of-bounds, set target point to
(angle, circle radius)- substitute length for circle radius!
- If in-bounds, set target point to
- Convert
(angle, length)back to(x, y) - Render the selector at
(x, y)
Of course, this takes place in a split second when you click to move the selector.
We have color!
At this point, we know that our selector will stay in-bounds and we can now reliably calculate a color value from our (angle, length) pair that we’re capturing! Our hue will simply be the angle, and our lightness will be length. To keep things simple, saturation will be fixed at 100%.
Getting out of the way
This color picker widget will be part of a touch-screen control so we needed to think about how our code might get in the user’s way and prevent a good experience. For example, what if you try to click the very edge of the circle but your touch is hitting just outside of the circle? We modified our code to respond to touches in a buffer zone outside of the color wheel and the selector circle to account for “fat fingers”:
After that we wrote a conversion function that would take the calculated HSL values and return an RGB value which our client then used on the application’s back end. And that’s it! Many layers of engineering went into making a color selector that “just works!”
Written by Dan Drust on 16 April 2020
Continue Reading: Finding Missing Routes in Rails